
Hair Bows
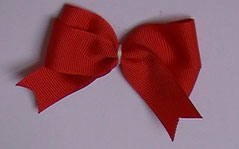
Hair bows can be made to look like they were purchased at a boutique!
You can learn to make:
- Basic Hair Bows:
- Double Loop :
- Twist:
- Loopy:
- Center Knots:
- Layered:
- Surrounds:
- Interchangeable:
- Korker Ribbon
in no time flat!
Learn To Seal Your Ribbon To Avoid Hair Bows From Fraying

The first step for making great ribbon projects is how to treat the ribbon. Watch the video
One of the things that will make the difference in how any project made from ribbon will look, is if you have sealed your ribbon properly or not. If you don't seal it right, it will fray and your bow won't look very nice for long. Here are some instructions for other ribbon ideas: Basic: Double Loop: Korker Ribbon
On this page you will find the links to instructions for all the accessories have listed, but you will need to visit often because we are constantly updating the site and adding more craft projects for you to make. When you are ready to make korker hair bows, you will need to make your own Korker Ribbon.
You will need some korker ribbon for some of the hair bows instructional tutorials!

Supplies Needed:
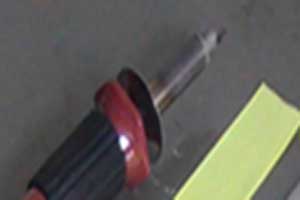
Wood working Tool- Joann Fabric or Michaels
Cookie Sheet- An old one
Metal Ruler
Ribbon
Step One:
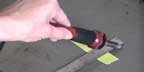
Heat up your wood working to until it is as hot as it will get. The only way to know for sure if it's hot enough is to try it out on a piece of scrap ribbon and see if it sears and seals cleanly for hair bows.
A word of caution is needed here:
Be extremely careful with this wood working tool because it get's very hot and will burn anything it touches!
Watch youtube sealing ribbon video!
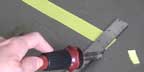
Step Two:
Place ribbon on top of the cookie sheet (I turn my cookie sheet up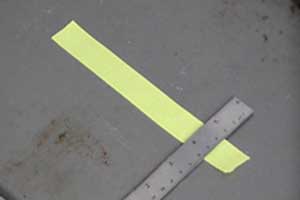 side down and use the bottom for my work area.) Place ruler at the point where you want to sear or seal the ribbon.
Step Three:
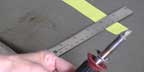
Using the wood working tool, place the tip of the tool on the metal cookie sheet. It is much easier to drag the tool through the ribbon if it starts on the cookie sheet. Now, slowly drag the tool along the edge of the metal ruler. You should be seeing the ribbon seperate. You can run the tool up and down the ruler to be sure it's seared and sealed. But, that's all there is to it!
** Make sure you are holding on to the ribbon and the ruler when you use your woodworking tool or your ribbon will not come out even!**
It sure beats trying to cut my ribbon and then sealing it with a lighter. Give it a whirl- you will love doing it this way!
Links to other tutorials:
Craft Projects
Seasonal
- Christmas Crafts
- Halloween Crafts
- 4th of July Crafts
- Mother's Day Crafts
- Father's Day Crafts
- Valentine's Day Crafts
- St. Patrick's Day Crafts
Resources


New! Comments
Have your say about what you just read! Leave me a comment in the box below.