
Horse Punch Art
Easy Horse Punch Craft Project
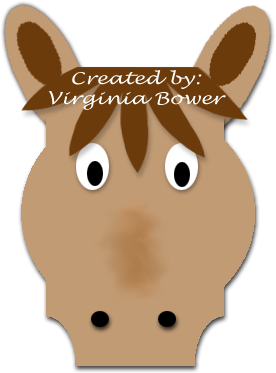

This Horse Punch Art craft project is easy to make and you will be able to do so many different things with it. Are you having an animal theme birthday party? You could easily make this into a cupcake topper!
Horse Punch Art Instructions:
Step 1:
The head for this horse punch art is from a tab punch, but if you don't have one then try using a square, rectangle and a circle to make the head. If you look closely, you can actually see where the rectangle would have the circle behind it and the square on top of it. The circle would be the cheeks.
When you've finished this Horse Punch Art craft project- go and do the others!
Step 2:
Layer the larger ovals and the smaller ovals for the ears and adhere them to the back of the head at an outward angle.
Step 3:
Layer the white and black ovals to make the eyes and adhere them to the face.
Step 4:
The hair is made from a flower punch and I just cut it in half... mine is a gi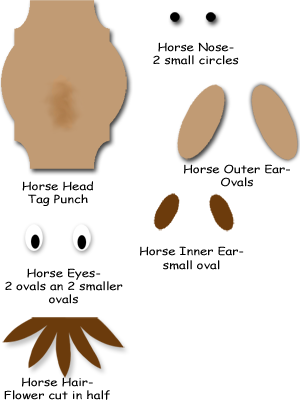 rl because it has more hair. If you want yours to be a boy make the bangs with only 3 of the pedals and center them on the head.
Step 5:
I used a little brown ink, but you could use chalk or whatever you have to make a smudge down the middle of the face. I thought that gave some definition to the face.
Step 6:
Take the little black circles and place them below the smudge mark out to the sides.
This is a great looking piece of punch art!
And, horse punch art projects are really easy to make, and you can do so much with them. Attach them to large paper clips and use them as bookmarkers. The would make great gifts. Or if you are having a party for a child attach them to gift bags or to cup or put on a t
New! Comments
Have your say about what you just read! Leave me a comment in the box below.