
Frog Punch Art
Easy Frog Punch Art with Paper Punches


Make this frog punch art and make it into a fridge magnet or you could even put in on a paper clip to make a bookmark. there are so many different things you can do with punch art! How about a fridge magnet? You could use this for party invitations.
Once you have finished making this frog punch art project, go and make the others!
Frog Punch Art Instructions
Step 1:
Layer the two circles for the body, the smaller one on top of the bigger one.
Step 2:
Layer the circles for the eyes and adhere them to the face and then adhere the face to the body. Here's the details for how I made the eyes. I cut 2 white circles, then 2 black circles and 2 green circles. Now I cut them to fit the way they look. The black circle is just a little bigger that the green circle to give the eyelash line. The actual eye lashed were drawn on with a pen.
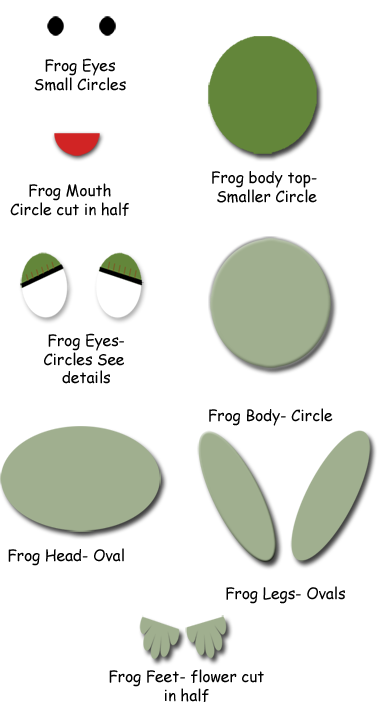
Step 3:
Adhere the mouth to the face, and with this I just cut a circle and then cut it in half.
Step 4:
The legs are two ovals. Adhere them at an angle.
Step 5:
Cut a flower in half and use them for the feet. Adhere the to the back of the body leaving a little hang out.
And again, These are really easy to make, and you can do so much with them. Use a frog punch art and
attach them to large paper clips and use them as bookmarkers.
They would make great gifts.
Or if you are having a party for a child attach them to gift bags or to cup or put on a tooth pick and stick in cupcakes!
Craft Projects
Seasonal
- Christmas Crafts
- Halloween Crafts
- 4th of July Crafts
- Mother's Day Crafts
- Father's Day Crafts
- Valentine's Day Crafts
- St. Patrick's Day Crafts
Resources


New! Comments
Have your say about what you just read! Leave me a comment in the box below.