
Basic Bow
How To Make Hair Bows

Learn how to make a basic bow whether it be for ribbon hair bows, cute bows for scrapbooking pages or just for decoration.
A basic bow can be used for many different projects such as scrapbook pages, gifts and cards and it can be made in many different sizes. All that needs to be different is the size and length of ribbon and the size of the cardboard.
This tutorial will show how to make a bow that is 2 inches long. Anyone can learn how to make basic bows or hair bows! The supplies also shows a lighter. The lighter is used to seal the ends of the ribbon. if you haven't done that or would like to learn more, here is information on how to keep your basic bow and ribbon from fraying. And, visit these links if you want to make double loop bows or korker ribbon bows.
Supplies Needed:
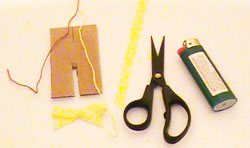
String
Scissors
Cardboard and a lighter
Step One:
 At any time you can view the basic bow youtube video by scrolling to the bottom of this page.
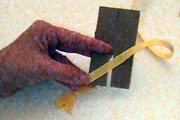
Take your ribbon for your basic bow and line it up to the lower corner of your cardboard, no need to cut it off of the spool just yet.
At any time you can view the basic bow youtube video by scrolling to the bottom of this page.
Take your ribbon for your basic bow and line it up to the lower corner of your cardboard, no need to cut it off of the spool just yet.
Step Two:
Wrap the ribbon around the back of the cardboard as shown.
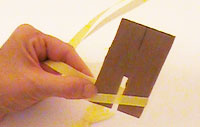
 Bring the ribbon bow around to the front and line it up on the other corner. Angle cut the ribbon. As you can see in the photo I am not holding on to the ribbon. I coated my cardboard with sticky note adhesive or Wackytac so I wouldn't have to hold it!
Step Four:
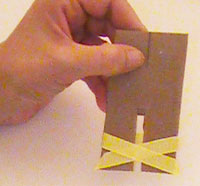
Take your string or floss and bring it up through the back of the cardboard and only cross in the front and take it back down to the back of the cardboard.
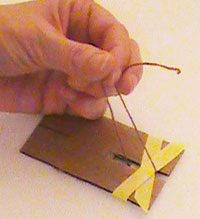
Step Five:
 Flip your cardboard over and and tie, pulling gently in order to get the front of your basic bow to gather in the proper place.
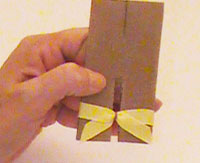
Step Six:
Once you have the ribbon tied in the back you can remove your ribbon bow from the cardboard and trim off the excess floss or string (unless you plan to tie it to something).
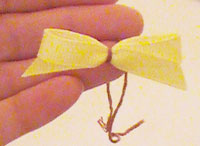
And... YAHOO! You have made a basic bow!
Now go and try to make ribbon bows with other sizes, you will be amazed what you will come up with! These are cute bows!
Now you know how to make hair bows.
Helpful Tips:
Any cardboard will work, as you can see I cut the flap off of a box. I measured it and cut off at 2 1/4.
I located the middle of the cardboard shown by the pencil mark at the top. If you want a 2 inch bow you will need to cut a 2 1/4 piece of cardboard, the 1/4 is how much you will cut out of the center of the cardboard to make the opening for your string or floss to move back and forth.
Use a lighter or a woodworking tool to seal the ends of the ribbon. To use a lighter, just hold the flame close, but not on the ribbon for avery short period of time. You will know when it's sealed when you can feel the ends are a little thicker or rougher than the rest of the ribbon.
Watch the Basic Bow youtube video!
Craft Projects
Seasonal
- Christmas Crafts
- Halloween Crafts
- 4th of July Crafts
- Mother's Day Crafts
- Father's Day Crafts
- Valentine's Day Crafts
- St. Patrick's Day Crafts
Resources


New! Comments
Have your say about what you just read! Leave me a comment in the box below.